controlling StyleGAN in real time
Most applications of GANs turn up as exported images or videos. Turns out though, it’s not that difficult to run inference in (almost) real time, as part of a reactive system. This is how I did it.
(update Dec 2021) We did something similar for this year’s Creative Coding, using the new(er) StyleGAN3-PyTorch model to project a live video feed.
(update Dec 2022) I updated the below to PyTorch/SG3 for a workshop, slides are here.
I’ve always been a music guy, and decided a long time ago visuals weren’t “my thing” beyond the occasional experiment. This is one of them: I trained my first GAN a few weeks ago, as part of my creative coding course @ ITPMA. But the really cool part is, once you have your model, to make it respond to whatever inputs you give it.
Before we begin, here’s two links to folks that showed me the way.
- Artificial Images and its associated youtube channel provide a bunch of practical information on training your own deep learning image models, with special emphasis on StyleGAN.
- These videos by Vasily Betin demonstrate the Python-Spout-TouchDesigner real-time connection. I follow most of his process in this guide.
Now, in order to keep this text to a manageable size, I’ll assume you’ve already trained your StyleGAN model, or you can always just use a pre-trained network. I’ll be using StyleGAN2-ADA on Windows, but a similar workflow should apply to any flavour of StyleGAN (or similar generative models) and Linux.
Also, before we begin, you should probably make sure you’re running a GPU with CUDA 10.1 support. I haven’t tried this on a CPU-only system but I doubt it’d work. You need Python 3.6 or 3.7, 64 bit – check the full system requirements in the StyleGAN repo.
Basic setup
You’ll want to work in a dedicated Python virtual environment,
since StyleGAN uses Tensorflow version 1.x,1 and it’s generally a good practice anyway.
In Windows I open cmd in an empty folder and run:
    > python -m venv venv
    > cd venv/Scripts
    > activate
    > cd ../..
Next, download the StyleGAN code repo. I use the Artificial Images fork, which adds some nice functionality:
> git clone https://github.com/dvschultz/stylegan2-ada.git
You could pip install all the requirements, but here’s the modules you need. I use version 1.14 of TF, as
specified in the official readme.
    > pip install tensorflow-gpu==1.14
    > pip install scipy Pillow requests moviepy opensimplex
Now, in order for the compilation to work in Windows, you need to set up Visual Studio 20172 and point to it. Get VS2017 if you don’t have it already. You can choose to just install Build Tools, or get the whole VS Community package.
Then, if you also have VS2019 installed, you need to edit
stylegan2-ada\dnnlib\tflib\custom_ops.py and change the corresponding line to point directly to
your VS2017 folder. Here, for VS Community:

Next, download your saved .pkl file (if any) into a subfolder like stylegan2-ada/models. Finally, you can
try out some basic image generation and it should work:
    > cd stylegan2-ada
    > python generate.py generate-images --network="./models/yourNetwork.pkl" --seeds=0-10 --outdir="./out/"
Check the stylegan2-ada/out folder and you should see 11 exported images.
The Python script
The next step is to write our own code for getting images and streaming them to an output buffer instead
of saving them to disk. To do this we’ll leverage the existing generate.py script, so it’s a good idea
to look inside and understand it, if you haven’t already.
First let’s deal with the streaming buffer. For this we’ll use Spout3, via the
Spout for Python library. Next we can copy
the Spout-for-Python/Library folder into our project, i.e. stylegan2-ada/Library (or you can keep it in a subfolder and
do sys.path.append('Spout-for-Python'), like we do here).
Also, don’t forget to install Spout-for-Python’s dependencies:
> pip install pygame pyopengl
Now we can create our own .py script, taking what we need from generate.py and Spout’s test.py.
The resulting generate_images() function might look like this:
def generate_images(network_pkl):

    # TF stuff
    tflib.init_tf()
    print('Loading networks from "%s"...' % network_pkl)
    with dnnlib.util.open_url(network_pkl) as fp:
        _G, _D, Gs = pickle.load(fp)

    Gs_kwargs = {
        'output_transform': dict(func=tflib.convert_images_to_uint8, nchw_to_nhwc=True),
        'randomize_noise': False
    }

    noise_vars = [var for name, var in Gs.components.synthesis.vars.items() if name.startswith('noise')]
    label = np.zeros([1] + Gs.input_shapes[1][1:])

    # create spout object, for 512x512 texture buffers
    spout = Spout(silent = False, width = 512, height = 512)
    # create sender
    spout.createSender('output')

    while True :
        # check on close window
        spout.check()

        # GENERATION:
        seed = random.randrange(9999)
        rnd = np.random.RandomState(seed)
        z = rnd.randn(1, *Gs.input_shape[1:]) # [minibatch, component]

        noise_rnd = np.random.RandomState(1) # fix noise
        tflib.set_vars({var: noise_rnd.randn(*var.shape.as_list()) for var in noise_vars}) # [height, width]

        image = Gs.run(z, label, **Gs_kwargs)
        # send data
        spout.send(image[0]) # use the first (and only) image from the minibatch
If all your imports etc are OK, you should be able to open a window displaying the texture, which samples randomly from the latent space in each frame:
> python generateRT.py generate-images --network="./models/yourNetwork.pkl"
You can access this texture stream in any compatible software such as TouchDesigner, Max, Resolume etc.
Sampling the latent space in real time
Now the only thing left to do is, instead of generating random z vectors inside the script, to send it
specific values from a source of our choosing. There’s many ways to do this: the tutorial I linked to uses
a Spout listener, but I’m more comfortable with OSC.
I use the python-osc library, which again is installable via pip:
> pip install python-osc
Then, we can simply add listeners for psi and z, to control them via OSC:
from pythonosc.dispatcher import Dispatcher

dispatcher = Dispatcher()

psi = 1
z = np.zeros((1,512))

def getPsiOSC(address, *args):
    global psi
    psi = args[0]

def getZOSC(address, *args):
    global z
    z = np.array(args).reshape(1,512)

dispatcher.map("/psi", getPsiOSC)
dispatcher.map("/wek/outputs", getZOSC)

from pythonosc.osc_server import BlockingOSCUDPServer
server = BlockingOSCUDPServer(("127.0.0.1", 5006), dispatcher)

# [... inside generate_images(): ...]
    while True :

        # check on close window
        spout.check()

        server.handle_request()
        Gs_kwargs['truncation_psi'] = psi
And there we have it. My complete code is here.
You can use it to get (1) psi and (512) z values on port 5006
from the OSC addresses /psi and /wek/outputs, respectively.
Now, one fun way to explore the 512-dimensional z space is regression, through Rebecca Fiebrink’s classic Wekinator tool.
Create a project with 2 (or whatever you like) inputs and 512 outputs, and you can adjust the sliders and see their impact on the inference in real-time, as fast as your GPU buffering will allow.
Normally, when dealing with such a large output space, the Wekinator workflow is to press the randomize button,
get some point in the space and record a corresponding input. Then, move to a different random output,
record another input, etc. And finally ‘Train’ and then ‘Run’.
If you try this, you’ll get a disappointingly small range of results. Why is this? You might want to stop for a second and think about it, if that’s the kind of thing you like to do for fun.
…
Remember how we sampled the space in our python script?
z = rnd.randn(1, 512)
The final n in randn means we’re sampling from a Normal aka Gaussian space, which is how the z latent
space is configured in a StyleGAN network. Meanwhile, hitting Randomize in Wekinator generates
independent random numbers, which is equivalent to sampling from a Uniform distribution.
The solution to this is to generate Normal random numbers and send them to Wekinator.
Here’s a Max patch that does it all: on the left, sending /psi directly. In the middle, using
the mouse as a toy 2D input into Wekinator. And on the right, sending the Gaussian random values for
Wekinator outputs.
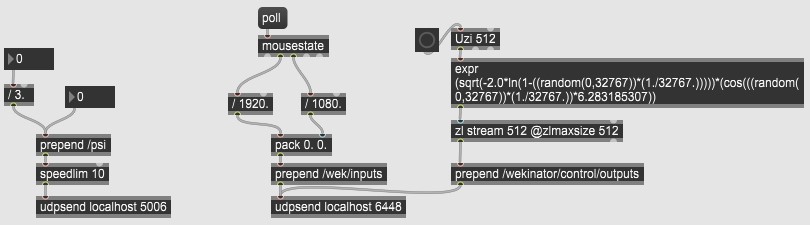
Here is the patch. Again, you can accomplish the same thing in various software, I just find Max the easiest.
And that’s it! I’ll update this post with a nicer demo vid someday, but for now here’s what I shot and posted to twitter the minute I got it to work.
-
(edit Mar ‘21) The official PyTorch version of StyleGan-ADA has been released, and it appears to be superior on all accounts. I may do an update post in the future, but for now get started with @dvschultz’s repo (video) ↩
-
despite what the repo suggests, VS2019 is apparently not supported, due to TF1.4’s reliance on CUDA 10.1 … oh the joy of sorting through outdated dependencies. ↩
-
Windows only. Mac users can probably do a similar trick using Syphon. Not sure what would work in Linux, let me know if you have pointers. ↩